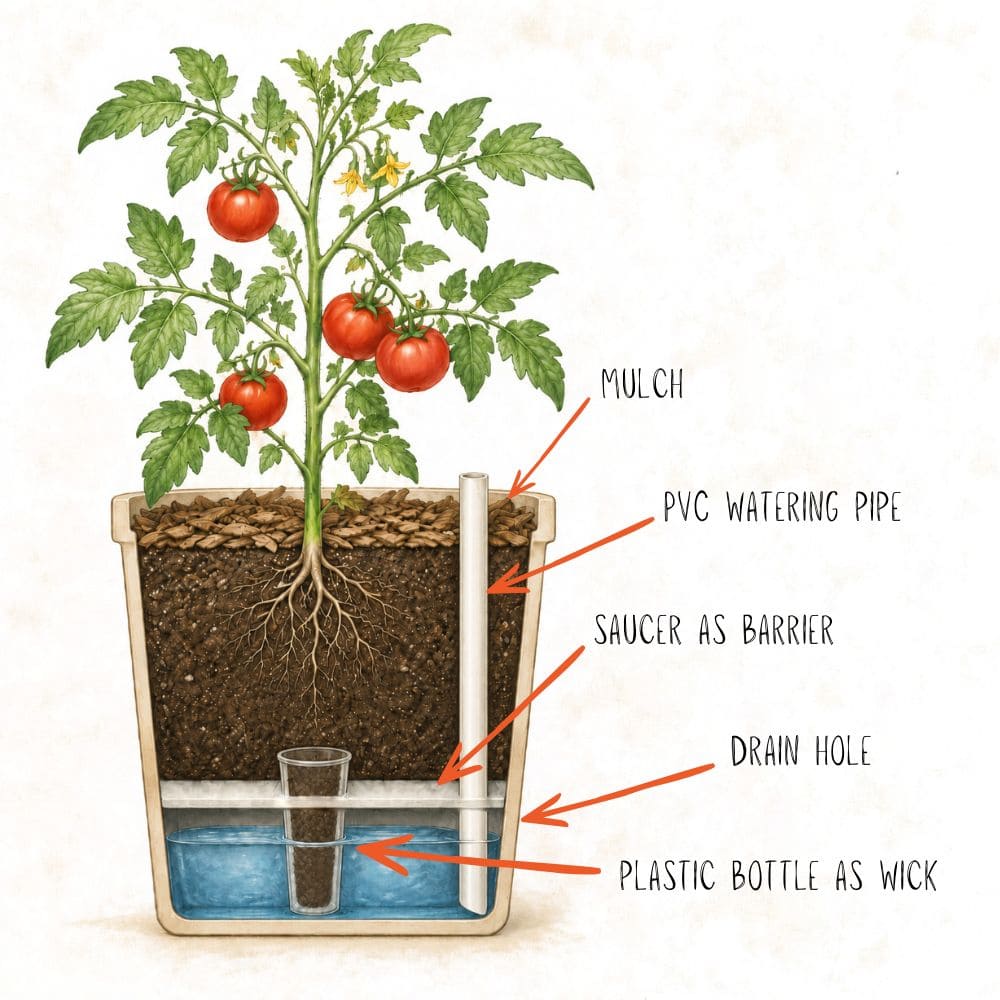
This self-watering planter uses a hidden water reservoir at the bottom of the pot. A wick (a plastic bottle filled with soil) pulls water up as the plant needs it, so you only refill every week or two instead of daily. This DIY version works with any decorative pot (not just ugly 5-gallon buckets) costs around $25, and takes about an hour. Here’s how to build one.
Last spring, we learned how to make a self-watering planter from Root Simple. Their tutorial is great, but it’s pretty ugly. We didn’t want 5-gallon buckets sitting on our deck, so we figured out how to make our own pretty self-watering planters out of ANY pot.
It was pretty easy AND cost under $25 for a 3 gallon-sized planter. They are really handy during summer travel or just for people like me, who forget to water. You can buy self-watering planters already made, but they cost quite a bit and they really don’t work as well as the homemade version. So, we tossed around some ideas and came up with this. Here it is:
How it works
The saucer will go inside the planter to create an upper and lower section inside your planter. The lower section will be your water reserve, and the soil and plant will sit on top. To get the water to the bottom, we’ll insert a watering tube through the saucer. To get the water to slowly wick back up into the soil and plant roots, we’ll insert a cup (or cut off bottle) with holes in it, into the center of the saucer. This bottle will be filled with soil and absorb the water from the lower section as the plant needs it.
The tutorial is for a 3-gallon planter, so if you use a different size, adjust everything accordingly.
Test the size of the saucer before you buy it, it should fit into the planter and hold itself up about 2 to 4 inches from the bottom of the bottom of the planter. Depending on the size of the saucer, you may need to turn it up-side-down to have enough space for the water, like this:

Supplies you need to make a self-watering planter (from any pot):
All you need is:
- A planter (with no drain hole in the bottom), like this, or this pretty one.
- A plastic planter saucer (a sturdy one like this, not the flimsy 50 cent version)
- An empty plastic one or two-liter bottle (bigger for a bigger planter)
- A length of PVC, about 2 feet long, any width over 2 inches will work
- A drill (our favorite that has lasted us over 5 years of remodeling)
- A hand saw (just a simple one, or whatever else you have that will cut plastic)
- And a helper is always handy:

Yes…a human helper is a little handier, but I’ll take what I can get, especially with that face.
(Some of the links above are affiliate links, which help support Little Victorian at no cost to you.)
1. Prepare your wicking bottle.
This is the bottle that is going to sit on the bottom of the planter and act as a wicking device to get the water to the soil.
Drill lots of holes (around 5/8ths of an inch is good) in the bottom half of the bottle. (This is a 1.5 liter bottle–bigger than it looks in the picture.) Smaller holes are fine as long as they are large enough to let water through and keep the soil damp.
Be careful with going larger than that with the holes because you don’t want the soil fall out into the water reservoir.

2. Cut a hole in the center of your saucer, just large enough for the bottle to fit through.
Place the saucer inside your planter and put the bottle on top of it. Trace the base of the bottle so you can cut it out.
A small hand-saw is fine for this. If your saucer is thinner, you could probably use a utility blade. Just remember that your saucer will need to be sturdy enough to hold the weight of all that soil and plant on top of it.

3. Cut the bottle so it will sit flush with the saucer.
Place the saucer and bottle into the planter. Press the saucer and bottle down as far as they will go. Mark your bottle just above the rim of the saucer, then take the bottle and saucer back out and cut the top of the bottle off along that line.
4. Prepare your watering tube.
Place your PVC pipe on the saucer, and trace it. You don’t have to be scientific about the placement, but about half way between the hole you cut for the bottle and the edge of the saucer will work.
Cut out the hole you just drew.

5. Adjust the height of your watering tube.
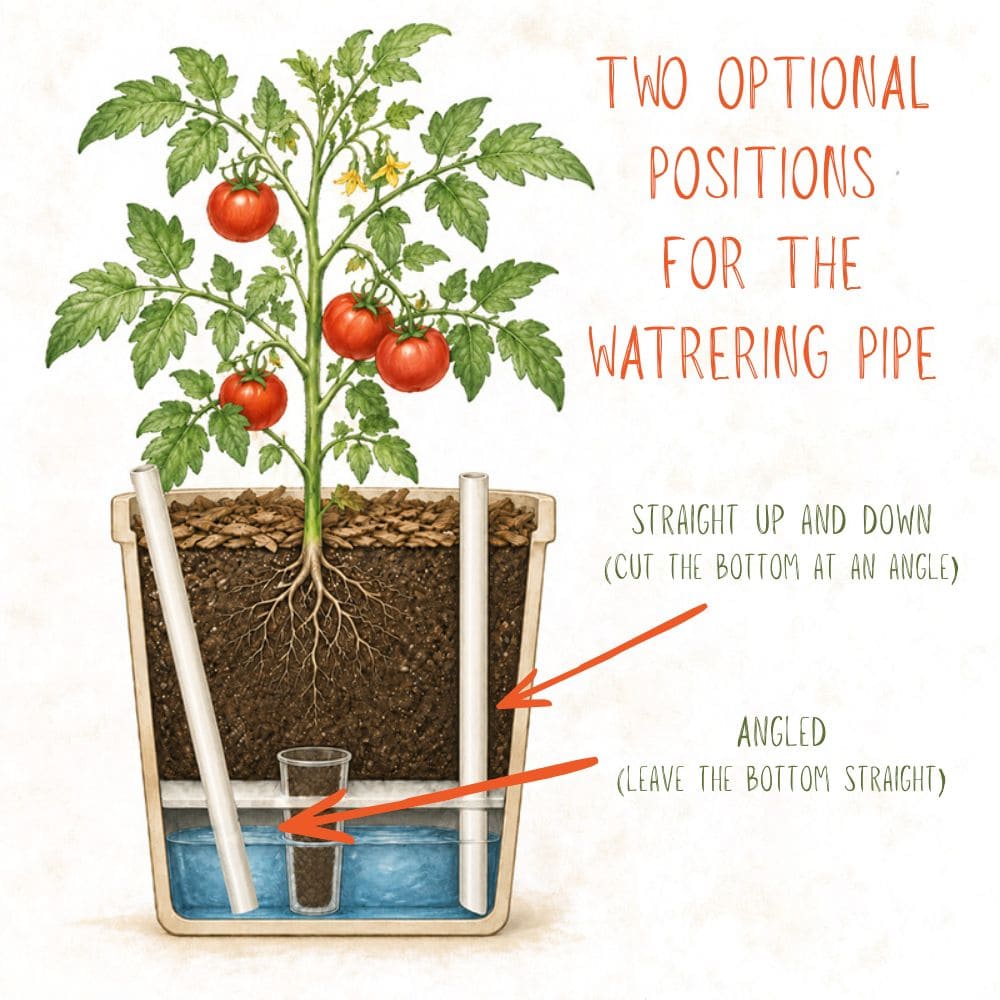
Place the pipe inside your planter and look at how tall it is. You don’t want it to stand too far out of the soil so it looks like you planted a PVC pipe. You only need it to be 2 or 3 inches above the soil line, so mark that spot and cut down your pipe as needed.
This is important: when I build these planters, I angle the water pipe once everything is ready, before I put the soil in. I tilt the pipe so that it will almost lean on the edge of the planter. It makes it easier for watering because you don’t have to try to go underneath the plant. But it also puts the bottom at an angle so the water will be able to flow. If you’re going to have your pipe straight up and down, you’ll need to cut the bottom end at an angle.
Place the saucer back in the planter. Insert the plastic bottle and the watering pipe.
Almost done!
6. Add a drain hole to your new self-watering planter.
You can either measure or eyeball it, but the drain hole should go through the planter and be just under the base of the saucer. This will do two things: keep the soil from holding too much moisture and it will let you know when you are done watering by spurting water out the side when it’s full.
7. Carefully start filling your planter with potting soil.
Use a little scoop or cup at first. Make sure that the plastic bottle wick is filled first, then load up the pot. As you are filling the pot, pull the top of your watering tube towards the edge of the planter so that it sits at an angle. (This will make for easier filling and it will ensure that the water can escape at the bottom and you aren’t just fruitlessly filling the tube with water and not the pot.)
You’re done! Plant away! And load it up with water. (At the initial planting, you should also water the top like a traditional planter, but for the rest of the season, you’ll only need to water through the pipe unless the top gets really dry.)

You are now free to go water your plants and forget about them for a week. Have fun and let me know how it goes if you tackle the project yourself.
Update: Another post with more self-watering planter options is here.
Here are links to some of the supplies through Amazon:

Cool! I hadn’t realized I could make one on my own and to any pot!! This expands the variety of pots that can be used. The self watering pots in stores are usually super ugly. Thanks for the tutorial.
They are pretty ugly, and expensive, and we found they just don’t work as well as these too.
Wicked smart, dude! I think me and my ‘black-thumb’ will be trying this. To date, I’ve killed every plant that’s been put in my charge.
You too, huh? Guess there are a lot of us. Let me know how it goes!
So smart! Where were you two weeks ago before I committed myself to non-self-watering pots?
Jessica
stayathomeista.com
Thanks Jessica! You can always add more plants… 🙂
Roses love this system of watering…I use big gallon size juice jugs and perf the bottom…works great…
Linda
xoxo
https://fashiontake-out.com
Really? That’s good to know, I still have those two rose bushes to replant.
What an awesome tutorial. I have been looking for a way to water the plants that did NOT include those glass globes. Thank you so much for sharing.
blessings,
karianne
Thanks Karianne, so glad you like it!
Christina, do you cover the soil with black plastic and just let the plants poke through or do you leave the pots open to rain?
Hi Angela! I do not cover mine with plastic. I leave them open because I prefer for them to be watered by rain (over city water) whenever possible. I know they will have to be watered a little more often without the plastic, but it’s worth it to me to have the chemical free water when we can. Because of the drain hole in the side, it’s not possible for them to be over-watered, so if it rains a lot, the rain water just collects in the bottom for later use.
Hi, Just a suggestion, but I use the perforated garden cloth around the top and cover with mulch just for the weeds and squirrels loving to help plant acorns and hickory nuts in my garden.
Thanks
Great tip, thanks for sharing!
Christina, sorry, I’m a bit confused… where is the drain hole on the side?
No problem Nikki! The drain hole should be through the pot, just barely under the edge of the saucer.
The saucer divides the pot into the lower level for water, and the upper level for soil. You want the drain to be at the top of the lower level to ensure that the water doesn’t reach the upper soil level. Does that make more sense?
Well thank you so much for your post. I have been watching youtube videos for weeks on this subject. They all talk about using 5 gallon buckets…..I wanted to use my own flower pots! You should post a how to video on you tube! Your the best!
You’re welcome, very glad I could help! We never thought of making a video, maybe we should!
Great post, very well done. I have to agree with you about most self watering planters on the market. Only came across one that I liked on http://www.godawn.com the Aqueous looks really nice and works really well! I have had it for 2 years, but still more expensive then DIY!
Hi there,
What a great idea. I will try to make a planter for my court yard. Without regular watering nothing will survive in the desert sun of NM. I wish I could find a similar idea for a galvanized water trough. I am planing grow a Wisteria in above mentioned courtyard for additional shade. Any input would be appreciated.
Thanks
Heidi
Yes, actually! What you could do (while it would be more expensive) is get two troughs. We did this on a smaller scale with two window planters, you can see it here, using this method. Let me know how it goes if you try it!
Works great and good directions, the hole size in the wick bottle is more like 1/4″ to 5/16″ than 5/8″
Thanks Bill! I can see how it looks like it would be a smaller 1/4″ hole, but the image is a little deceptive because it’s a 1-liter bottle. You will want the bigger hole around 5/8ths to let more water in.
Thank you so much. I will try that. I have killed many plants but still want to try again ?
I do the same thing every spring. The garden dies (from bugs now, not lack of watering), and I say “Never again!” Then spring comes and I try again anyway. Hope your container garden thrives! 🙂
I like this idea a lot, but am a bit unclear on step 6- drain hole in planter. How do you do this, say you have a ceramic planter?
Sorry about that, that’s why I’m going to update this post soon. If you have ceramic, you’d want to use a carbide-tipped/masonry drill bit. You probably only need 1/4″ or so, no more than that. You didn’t leave your email, so I can’t email you directly, but if you have more questions, feel free to email me [email protected]
You’re going to love it once it’s done!
i don’t understand what the point of the plastic bottle is, since you pour the water thru the pipe…?
The plastic bottle is a vital part because it is the wick that takes the water from the bottom to the rest of the soil.
The bottle gets filled with soil, and because it’s sitting below the water line, the soil in it absorbs the water through the holes and feeds the rest of the soil above it.
Does that make more sense?
YES! Thank you!
How did you cut the holes in your saucer? This is where I’m getting stuck!
Sorry! Going to add that to the instructions. I used a regular “jab” hand saw (like this). If you have a HIGH-QUALITY utility blade and your saucer isn’t too thick, you could use that too.
I do a self watering planter but do not cut the top of bottle so plant no good. When I read your text I understand Why.
Thank you very much
I don’t understand Step #6. You start with a planter that has no drainage hole, and then you add a drainage hole to it? I don’t understand how the water stays in the bottom then?
You drill the drain hole on the side of the planter, just under the level where the saucer sits (so depending on that level, probably 3-5 inches from the bottom of the pot. Otherwise when you fill it the water level will also saturate the soil above the saucer and it then you’ll struggle with mold and mildew inside the pot.
This is such a fantastic guide on making self-watering planters! I love how practical and eco-friendly it is. The step-by-step instructions are easy to follow, and I’m excited to try creating my own. Thank you for sharing these wonderful tips! Happy gardening!
I will try this, but I may add cotton cording in the water wick bottle long enough to come out into the soil at planting depth to aid thorough water distribution.
Sounds good! Come back and let me know how it goes!